So, You’ve Decided to Start an Online Store?
Nice. That’s a bold move and a smart one.
Launching an online store today is way easier than it was 5–10 years ago. You don’t need to be a developer, you don’t need a huge budget, and you don’t need to know every marketing hack in the book.
But don’t let the Instagram noise fool you. While it’s easier, it still needs direction. Without a roadmap, it’s easy to get stuck before your first product goes live.
So let’s cut through the confusion. Here’s a step-by-step guide to online store setup written like you and I are grabbing a coffee and I’m walking you through it, start to finish.
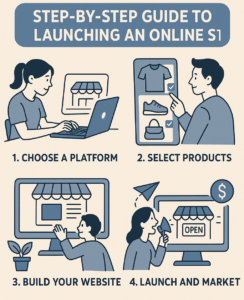
Step 1: Find Your Product (Or Niche)
Before anything else, you need to figure out what you’re selling.
Are you into handmade candles? Vintage clothes? Tech gadgets? The product doesn’t need to be perfect but it should have a clear demand.
Spend a day doing this:
- Search trending products on Amazon, Flipkart, Etsy
- Check Google Trends
- Lurk in Facebook or Reddit communities
- Talk to friends, run polls, ask real people
Whatever you choose, just make sure you’re solving a real need or bringing something interesting to the table. That’s the first step to building an online business that lasts.
Step 2: Choose a Business Name & Book Your Domain
Pick a name that feels like you are simple, easy to remember, and easy to spell. Don’t overcomplicate it.
Once it clicks, book the domain ASAP. Even if you’re not launching tomorrow, grab it before someone else does. You can get domains on GoDaddy, Google Domains, or Namecheap.
It’s like putting a nameplate on your digital storefront.
Step 3: Choose Where You’ll Build Your Store
Time to talk platforms.
-
Shopify
Best For: Beginners & intermediate users looking for an all-in-one solution
Highlights:
- No coding needed
- Built-in hosting & SSL
- Mobile-optimized themes
- Huge app store for scaling
- Pricing: Starts at $39/month
- Ideal For: Clothing, accessories, D2C brands
-
WordPress with WooCommerce
Best For: Full control, flexibility & SEO-friendly stores
Highlights:
- Free and open-source
- Thousands of free/paid plugins
- Great for content + commerce
- Needs separate hosting (like Hostinger, Bluehost)
- Pricing: Free plugin + hosting cost (starting ₹99/month)
- Ideal For: Bloggers, marketers, tech-savvy entrepreneurs
-
Wix eCommerce
Best For: Creative sellers who want easy drag-and-drop
Highlights:
- Beautiful templates
- Easy customization
- Includes marketing tools
- Pricing: Starts around ₹225/month
- Ideal For: Art, jewelry, personal brand stores
- BigCommerce
Best For: Fast-scaling businesses
Highlights:
- Advanced backend features
- Multi-channel selling (Amazon, eBay, FB)
- No transaction fees
- Pricing: Starts at $29.95/month
- Ideal For: Wholesale, electronics, global stores
-
Squarespace
Best For: Visually-driven brands
Highlights:
- Elegant, award-winning templates
- Easy product and blog management
- Secure and beginner-friendly
- Pricing: Starts at $23/month
- Ideal For: Artists, photographers, portfolios
-
Zyro by Hostinger
Best For: Budget-friendly launch
Highlights:
- AI tools built-in (for writing, design)
- Clean templates
- Fast website speed
- Pricing: Starts at ₹250/month
- Ideal For: Startups, small local businesses
Step 4: Design the Store (Without Overthinking It)
Now for the fun part of your store’s look.
Most platforms have ready-made themes you can customize. Choose one that matches your vibe, but always keep this in mind: your site needs to be clear, easy, and mobile-friendly.
Ask yourself:
- Can someone understand what I sell in 5 seconds?
- Can they browse and check out without confusion?
- Does it load fast?
This isn’t just about looks. This is real online store development, the part that decides whether someone buys or bounces.
Step 5: Set Up Payments, Shipping & Policies
If people can’t pay, they won’t buy.
Integrate payment gateways like Razorpay, PayPal, Stripe whatever works in your region. Most platforms guide you through this.
Then sort out:
- Your shipping process (local courier? ship yourself?)
- A basic return/refund policy
- Terms & privacy pages (you can find free templates online)
Make it smooth and secure. People should feel like they’re buying from a real business because they are.
Step 6: Add Your Products (Make Them Look Good)
Now it’s time to upload your products.
Don’t underestimate the power of clean, high-quality photos. You don’t need a fancy camera. Just good lighting, natural background, and clear angles.
Keep your product descriptions short and helpful. You’re not writing a novel, just answering one simple question: “Why should I buy this?”
If you nail this, you’ve taken a big step toward launching an online store that actually converts.
Step 7: Test Everything Before You Go Live
This is where most people skip ahead and regret it later.
Click around your site like a real customer:
- Can you add to cart easily?
- Is checkout smooth?
- Does the site load fast on mobile?
- Are any buttons broken?
Ask a few friends to try it too. Don’t worry about perfection, just make sure it works well.
Step 8: Go Live & Tell Everyone
This is it. Launch day.
Don’t overthink it. Hit publish and share it with your world:
- Post on your personal and business Instagram
- Message your contacts on WhatsApp
- Email your close circle
- Join founder groups and share what you’re building
This is where you stop prepping and start building an online business in public.
Step 9: Start Marketing Slowly, Consistently
No, you don’t need to run ₹50,000 ad campaigns from day one.
Start simple:
- Share reels and stories on Instagram
- Answer questions in niche communities
- Do basic SEO blogs, product titles, descriptions
- Try email marketing even if it’s just a few subscribers
You don’t need to do everything. Just do something every day that brings people to your site.
This is what e-commerce for beginners really looks like showing up, learning on the go, and improving with time.
Step 10: Keep Learning & Keep Tweaking
Your store is live, but your journey just started.
Keep an eye on what’s working:
- Which products sell most?
- Where are people dropping off?
- Are people coming back?
Use tools like Google Analytics or your platform’s built-in reports. Experiment. Change photos. Update headlines. Add reviews. Every small change helps.
And don’t be afraid to fail fast. That’s how most successful founders figure it out.
Final Thoughts Let’s Make This Real
Launching an online store is no longer just for techies or big-budget brands. It’s for anyone with a product, a story, and the willingness to learn.
You’ve got the idea. You’ve got the tools. Now all that’s left is action.
And if you don’t want to stress over the setup, design, or tech let’s build it together.
Let’s Launch Your Dream Store With Marketing Via Digital
At Marketing Via Digital, we help first-time founders and small businesses start an online store that looks great, works fast, and converts like crazy.
We handle everything from e-commerce website setup to payments, product uploads, and mobile optimization.
📞 Call us at +91 9818629898
🌐 Visit: www.marketingviadigital.com
Whether you’re just starting or finally ready to go live, we’re here to build it with you human to human, founder to founder.
FAQs
Q1 How much does it cost to launch an online store?
You can literally do it under ₹10,000 if you start lean. Shopify, hosting, a domain, and a few tools.
Q2 Do I need to know coding?
Not at all. Every major platform now is drag-and-drop friendly.
Q3 Is it hard for beginners?
Not if you follow a step-by-step plan like this. It’s all about getting started, not getting perfect.
Q4 Which is more important: the website or marketing?
Both. Your site converts, but marketing gets people there. You need both hands to clap.
Related Searches
Top 10 Website Development Expert In Delhi
Top 10 Website Designing Expert In Delhi
Top 10 WordPress Website Development Services In Delhi
Top 10 Responsive Website Development Services in Delhi